How To Schedule An Announcement On Discord
Page Contents:
Discord has become the go-to platform for communities, whether it’s for gaming, hobbies, or professional interests. However, managing a server can be a challenging task, especially when it comes to making announcements.
This is where dotNotify, steps in.
Step 1: Install dotNotify

- Visit the dotNotify website and click on the “Invite” button.
- Select the server where you want to install dotNotify.
- Authorize dotNotify to access your server by clicking on “Authorize”.
Step 2: Accessing the Dashboard

After successful installation, you’ll land on the dashboard. From here, you will be able to create and manage your scheduled announcements.
You can then create a standard Discord message announcement or an embed-style announcement.
We will go with just a standard text announcement to keep this tutorial simple.
Step 3: Create a New Announcement

Click on the “Create” button to start scheduling your announcement. This will take you to a new page where you can create, customize and preview your announcement.
Step 4: Customize Your Announcement

- Compose Your Announcement: Write your announcement message. You can use the rich text editor to format your text, add emojis, and more.
- Schedule the Time: Choose the date and time you want the announcement to be posted. Remember to select the correct time zone.
- Select the Channel: Choose the channel where you want the announcement to be posted.
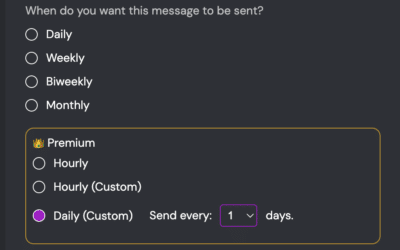
- Repeat Options: If this announcement needs to go out regularly, you can choose to repeat it daily, weekly, or monthly.
Step 5: Schedule Your Announcement

Click on the “Schedule” button. Your announcement is now scheduled! It will be posted in the chosen channel at the specified time.
Step 6: Manage Your Announcements

You can view, edit, or delete your scheduled announcements from the dashboard. Simply click on the drop down button in the top right of each scheduled message.
Tips for Creating Effective Announcements
That’s how easy it is to schedule an announcement on Discord using dotNotify. You can now schedule as many announcements as you want.
Be sure also to keep these things in mind:
- Keep it Concise: Your announcement should be short and to the point. Avoid unnecessary fluff.
- Use Clear Language: Ensure that your announcement is easy to understand. Avoid jargon and overly complex sentences.
- Engage with Your Members: Encourage your members to react to your announcement or start a discussion.
With dotNotify, scheduling an announcement on Discord has never been easier. Now you can ensure that your members never miss an important update, no matter their timezone.