How To Schedule A Discord Message
Page Contents:
dotNotify is a powerful Discord message schedule bot designed to simplify message scheduling and management for server owners.
With its user-friendly dashboard and versatile features, dotNotify takes the hassle out of creating and scheduling Discord messages, announcements, reminders, and updates.
In this guide, we’ll walk you through the process of how to schedule a Discord message using dotNotify, from signing up to managing your scheduled messages.
If you’re searching for help on how to schedule messages on Discord, dotNotify makes this easy, and once installed, you can schedule messages for any date, time or channel, as well as setup repeat messages too, which we will get onto further down.
Signing up for dotNotify

If you are yet to sign up for dotNotify, you can try out all features in full for free in minutes. To do that, you can visit this page here! On that page, you can see all the features and benefits of using the dotNotify Discord bot on your server.
To get started using the platform and bot, all you need to do is connect your Discord user account. Once connected, you’ll need to follow the steps below, which take less than 60 seconds.
Connecting dotNotify to Your Discord Server:
To get started with scheduling your first Discord message, you need to connect dotNotify to your Discord server.

Follow these steps:
- Navigate to the dotNotify dashboard, and you’ll be met with an “Install Our Bot” screen like shown above.
- Click to install the bot and choose the server you want to schedule messages on.
Accessing the dotNotify Dashboard:

With dotNotify connected to your server, you can now access the intuitive dashboard.
Here, you’ll find all the tools you need to schedule and manage messages on your server.
Use the dashboard’s navigation menu to access the message scheduling area of the app.
Creating a Scheduled Message:

To schedule a message with dotNotify, follow these steps:
- In the dotNotify dashboard, navigate to the “Create” section.
- Compose your message using the WYSIWYG editor for formatting, and adding emojis if you want too.
- Select the date and time for your message to be sent, adjusting for different time zones if necessary.
- Select the channel you would like the message to be sent too.
- Click “Schedule” to save your message, and it will be sent automatically at the date and time you have chosen to the chosen channel.
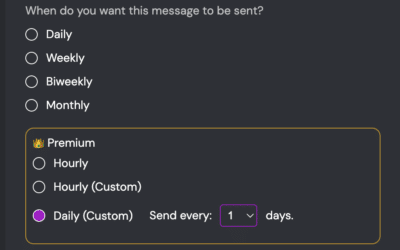
Creating A Repeat Or Reminder Discord Message:

TIP: Before hitting schedule, you can set up a recurring or reminder message too. By clicking on the optional checkbox, you can now set your message to be sent every day, week, or month on the same day, and also set an end date for your recurring message.
This part is optional, so leave this unchecked if you want to schedule a message to be sent once.
Managing and Editing Scheduled Messages:

dotNotify makes it easy to view, edit, or delete your scheduled messages.
To manage your messages, navigate to the “Dashboard” section of the app. Here, you can see a list of all your scheduled messages, in order of next to be sent, along with their status, channel, and scheduled time.
To edit or delete a message, click on the corresponding drop-down next to the message.
If you switch the toggle to repeat messages, you can also manage your reminder or repeat messages here. You can pause and delete them and filter them based on frequency to help you better manage your Discord scheduled messages.
Advanced Scheduling Options and Best Practices!

dotNotify offers a platform to make it easy to schedule and manage Discord messages and announcements. To get the best results, keep these things in mind:
Keep your messages concise, clear, and engaging.
Choose the optimal time for your audience, considering factors like peak server activity and time zones. This is one reason scheduling messages is so powerful.
Test various message formats and styles to determine what resonates best with your community.
How To Schedule a Discord Message – Easy Peasy!
Scheduling messages on Discord has never been easier, thanks to dotNotify’s user-friendly interface and powerful features. By following this step-by-step guide, you can efficiently create, schedule, and manage messages for your server, ultimately boosting engagement and improving your Discord community.
Next up, it’s “take action” time. Give dotNotify a try and experience the benefits of scheduled messaging firsthand HERE!